
Kitchener Stitch is a technique for seamlessly joining together pieces of knitting without a visible join. The first design in which I used this technique is the Khiva cowl, which is knitted in the round like a long tube and then grafted together. The original pattern contains links for some third party online tutorials which explain the basic technique very clearly. I have created this post in order to supplement this and to gather together information on how to work this grafting technique in a variety of ways: eg to join flat knitted pieces as opposed to pieces worked in the round, using stockinette or garter stitch.
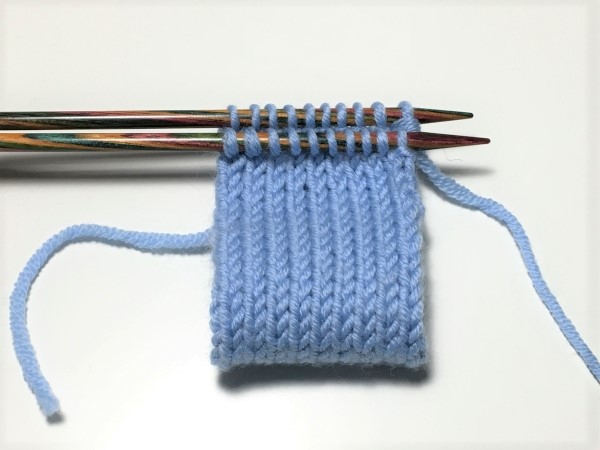
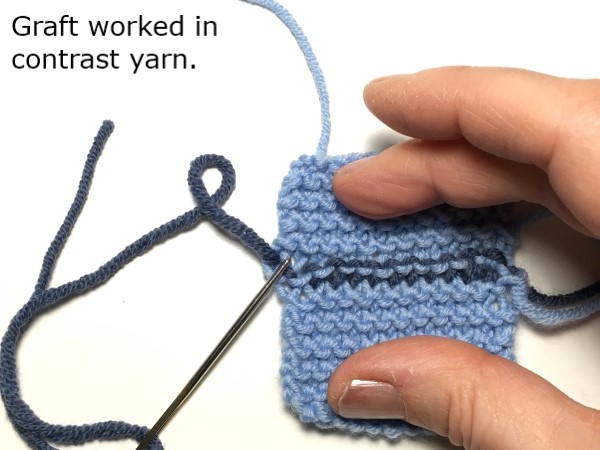
The technique joins together two sets (of equal numbers) of ‘live’ stitches using a tapestry needle to weave yarn in and out of the two sets of stitches in a manner which mimics an additional row of knitting. In the stockinette sample below you can see the grafted row in a contrasting colour.

Grafting flat pieces of knitting – general points
The two sets of stitches to be joined may both comprise live stitches from the top of two separately knitted pieces (see photo – both these pieces have a cast-on edge at one end and live stitches at the other) or, in some cases, from a single piece of knitting folded in half lengthways where half the stitches would be placed on each of two separate needles.

Alternatively the live stitches may come from the top of one piece and the bottom of the same, or another, piece where a provisional cast-on has been used (see photo – this piece was created using a provisional cast-on which has been undone and the stitches placed on a needle ready to be joined to form a continuous loop of knitting).

Note: refer to my separate post on the crochet provisional cast-on method. When using a provisional cast-on method for a piece of flat knitting, as you undo the cast-on and place the loops on a needle you may notice you have one loop fewer than the number of stitches originally cast-on. This is because the stitches you can see sitting on the needle comprise the loops which were in between the original knitted stitches, which means that there is an additional half-loop at either end of the row. It is possible to pick up one of these half-loops to form an extra stitch on the needle in order to have the correct number of stitches for grafting (because the two sets of grafted stitches need to be equal in number). The same principles apply if performing a three-needle bind-off (eg as in my Nafura mitts). This issue does not arise when working in the round as there are no edge stitches.
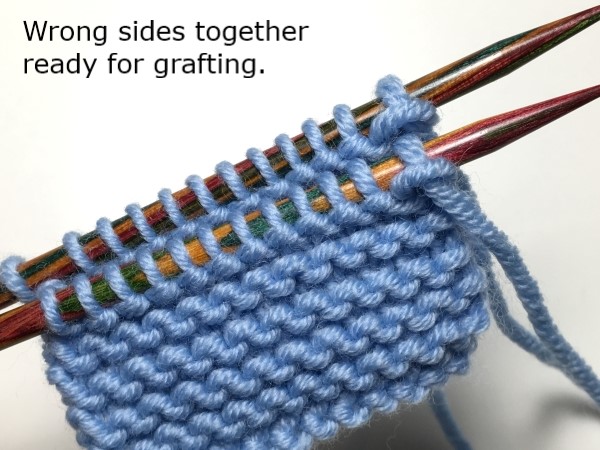
Before starting to graft, the two sets of stitches need to be on separate needles (or either end of a circular needle) and held together with the wrong sides facing each other and both needles pointing towards the right as shown in this photo.
The grafting may be done using one of the yarn tails from the piece(s) of knitting to be joined, or using a separate piece of yarn (as used in the examples below – for contrast). The yarn should be 3 to 4 times the length of the graft. Thread the yarn onto a tapestry needle. If using an existing yarn tail from the front piece of knitting, first secure it to the back piece by passing the needle through the edge stitch just beneath the first stitch on the back knitting needle. If using separate yarn, it is not necessary to attach it but leave sufficient yarn tail for weaving in later.
Grafting stockinette – flat
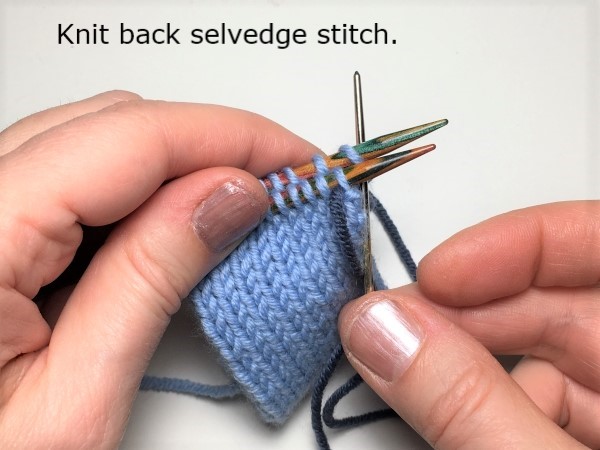
A: Set-up stitches (selvedge)
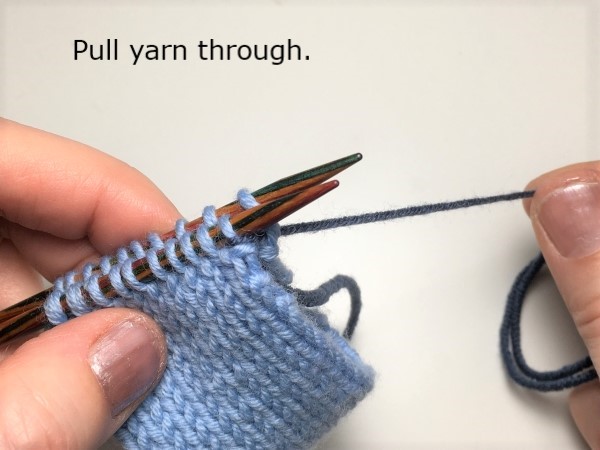
Pass tapestry needle purlwise through first stitch on front knitting needle, pulling yarn through, then knitwise through first stitch on back knitting needle and pull yarn through. Leave stitches on the knitting needles.


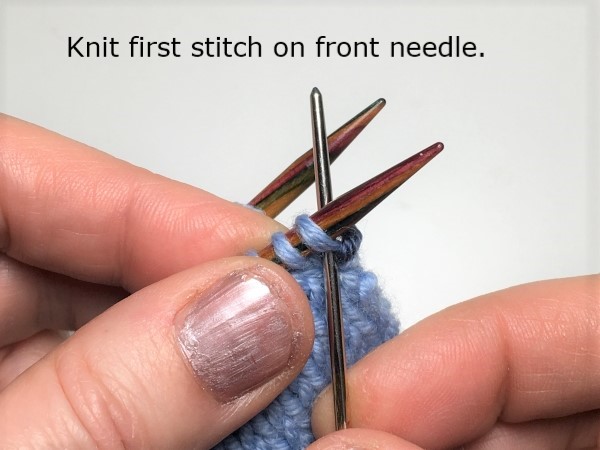
B: Front needle sequence
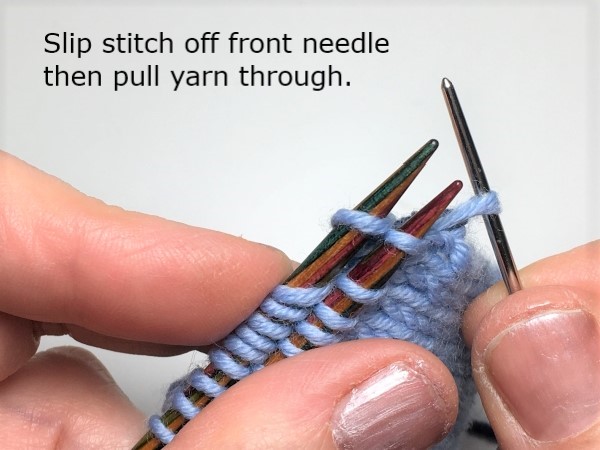
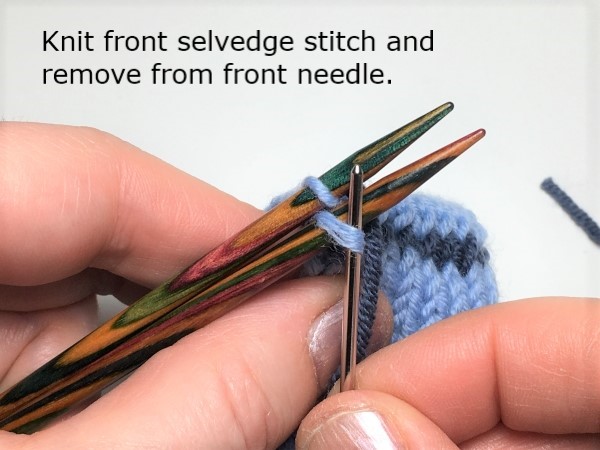
Pass tapestry needle knitwise through first stitch on front knitting needle and slip stitch off that needle before pulling the yarn through.
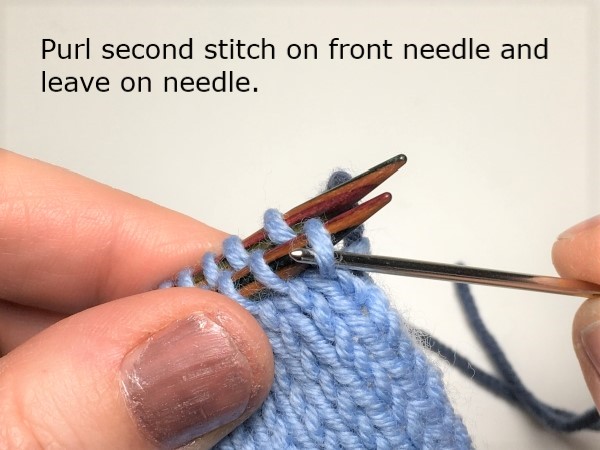
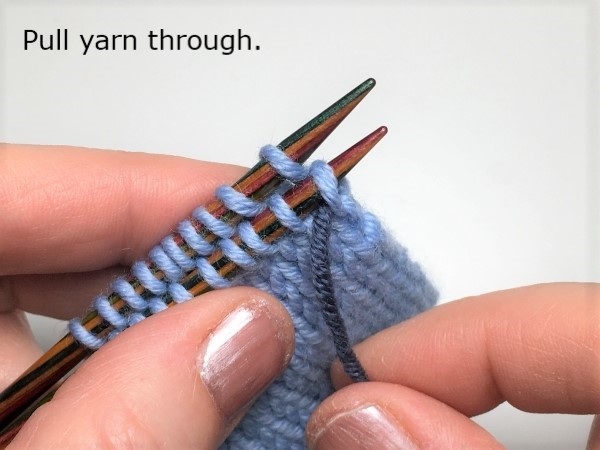
Pass tapestry needle purlwise through second stitch on front knitting needle, leaving stitch on that needle, and pull the yarn through.
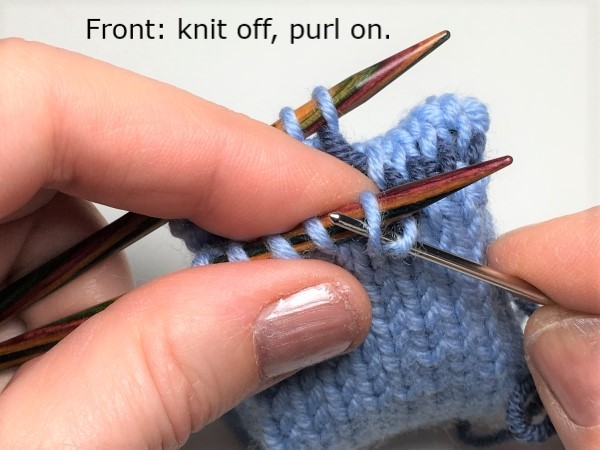
This sequence can be abbreviated: “front: knit off, purl on” and both steps may be carried out in one manoeuvre before drawing the yarn through, which saves time when the length of the graft (and hence the yarn tail) is rather long.
C: back needle sequence
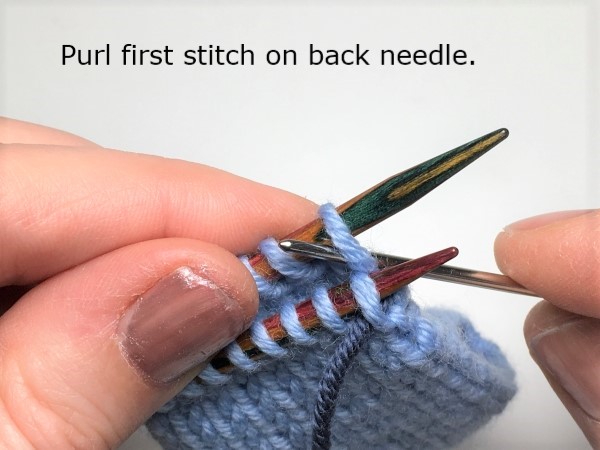
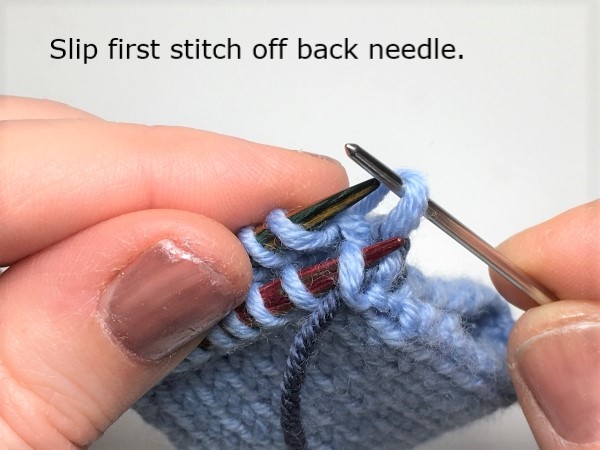
Pass tapestry needle purlwise through first stitch on back knitting needle and slip stitch off that needle. Draw yarn through (not illustrated below).
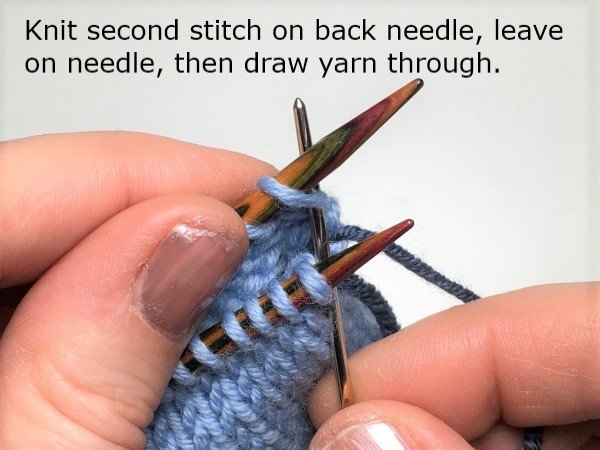
Pass tapestry needle knitwise through second stitch on back knitting needle, leave stitch on back needle and draw yarn through.
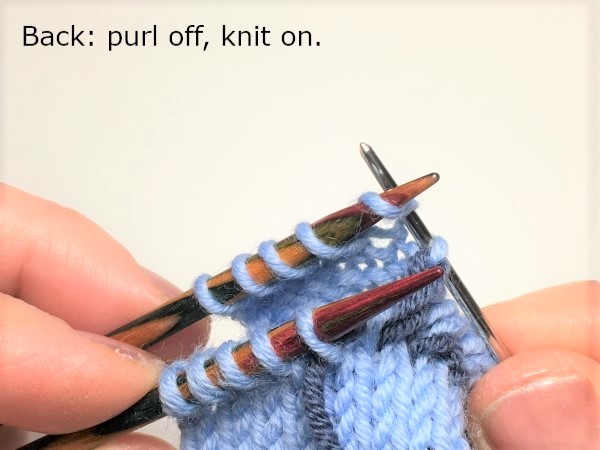
This sequence can be abbreviated: “back: purl off, knit on” and both steps may be carried out as one manoeuvre before drawing the yarn through.
Repeat sequences B & C until only one stitch remains on each needle.
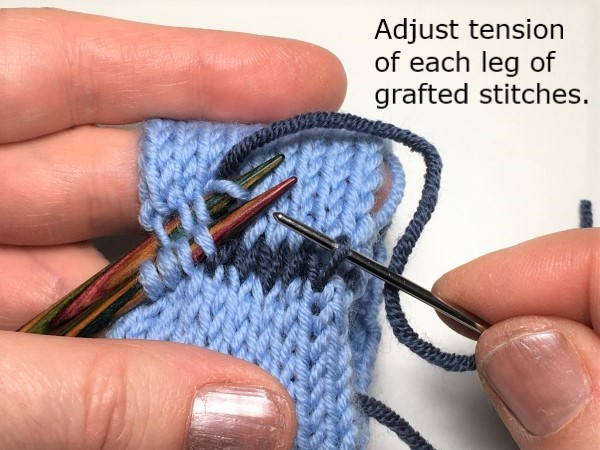
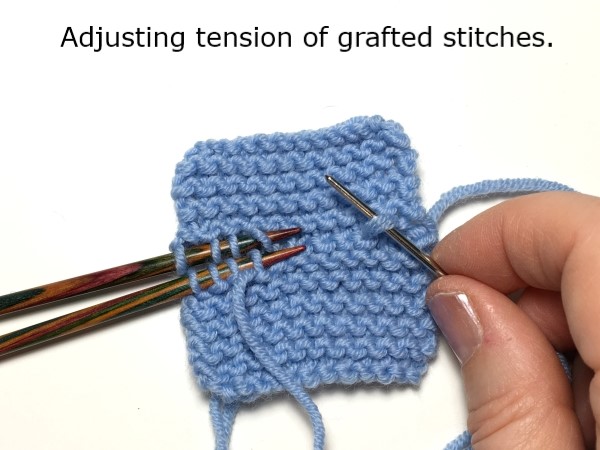
Adjust tension every few stitches using the tapestry needle to lift each leg of the stitches and tighten the yarn to match the gauge of the knitted pieces.
D: final selvedge stitches
Finish with the following steps:
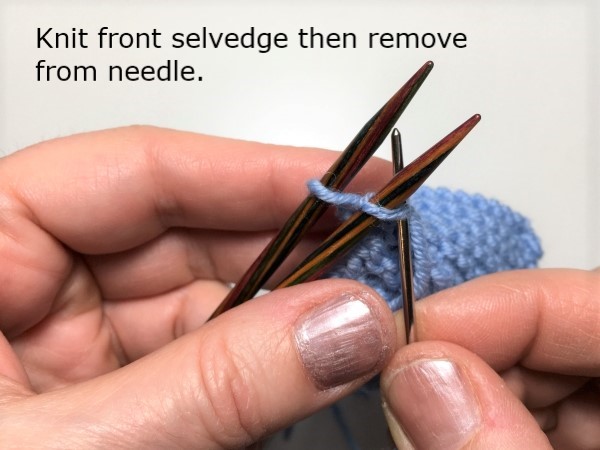
Pass tapestry needle knitwise through final stitch on front knitting needle and slip stitch off that needle.
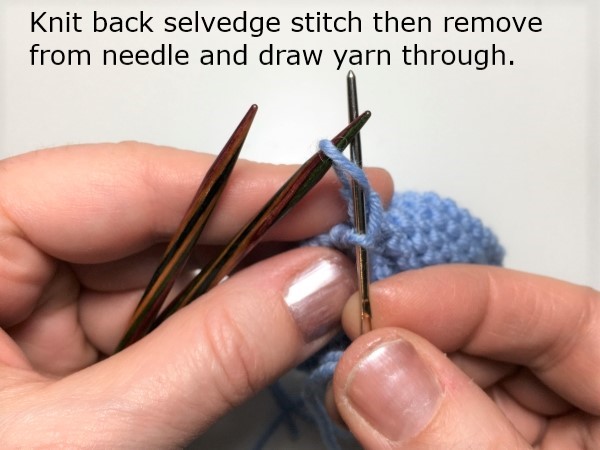
Pass tapestry needle purlwise through final stitch on back knitting needle and slip stitch off that needle, drawing yarn through both stitches.


Grafting Garter Stitch – flat
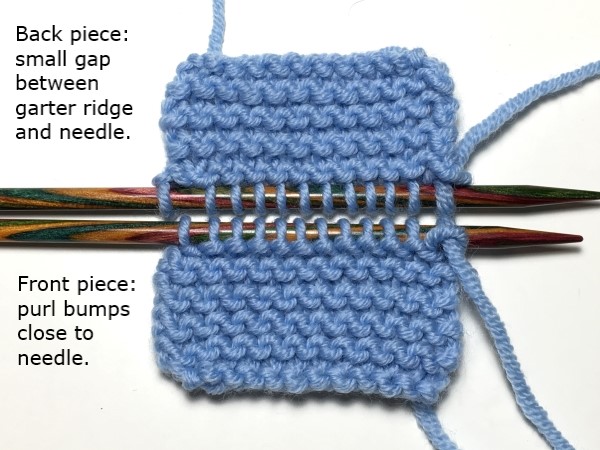
Unlike stockinette stitch, where all rows appear the same, it is necessary, with garter stitch, to have the correct alignment of knit stitches and purl ridges on the two needles. The grafted row will form a row of knit stitches when applied to the live stitches on the front needle, therefore the purl ridge needs to sit immediately below the needle. On the back needle, however, the purl ridge should sit further away from the needle when viewed from the right side of the piece. When grafting stitches from the top of two pieces of garter stitch knitting, this means the front piece should have finished with a wrong side row and the back piece with a right side row. Place both pieces with wrong sides together ready to start the graft.
If using a provisional cast-on, it works well if the first row worked after the cast-on is a wrong side row so that, when the cast-on is undone, the stitches are aligned like the back piece shown above. The live stitches forming the front piece will be correctly aligned by ending with a wrong side row, as above.


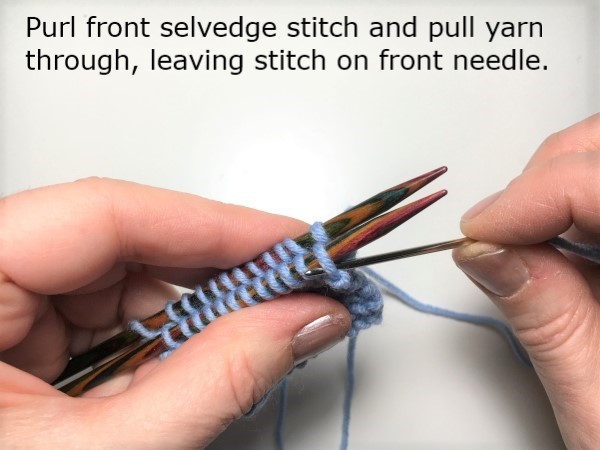
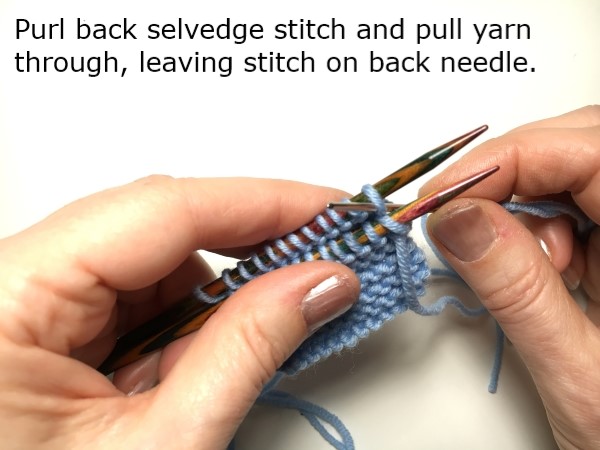
A: Set-up stitches (selvedge)
Pass tapestry needle purlwise through first stitch on front knitting needle, pulling yarn through, then purlwise through first stitch on back knitting needle and pull yarn through. Leave stitches on the knitting needles.
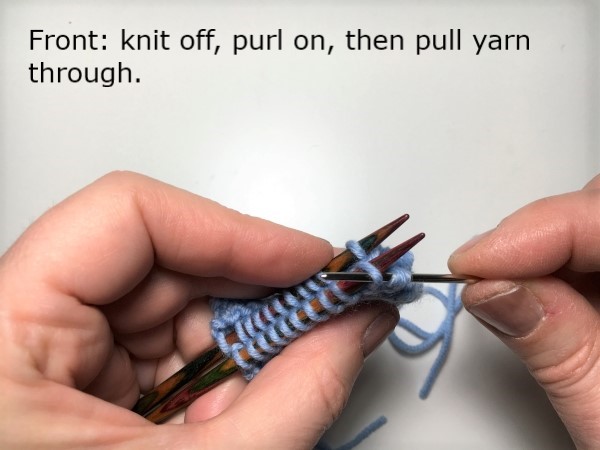
B: Front needle sequence
Pass tapestry needle knitwise through first stitch on front knitting needle, draw yarn through and slip stitch off that needle.
Pass tapestry needle purlwise through second stitch on front knitting needle, draw yarn through and leave stitch on that needle.
This sequence is identical to stockinette grafting (above) and can be abbreviated: “front: knit off, purl on” and both steps may be carried out before drawing the yarn through, which saves time when the length of the graft (and hence the yarn tail) is rather long.
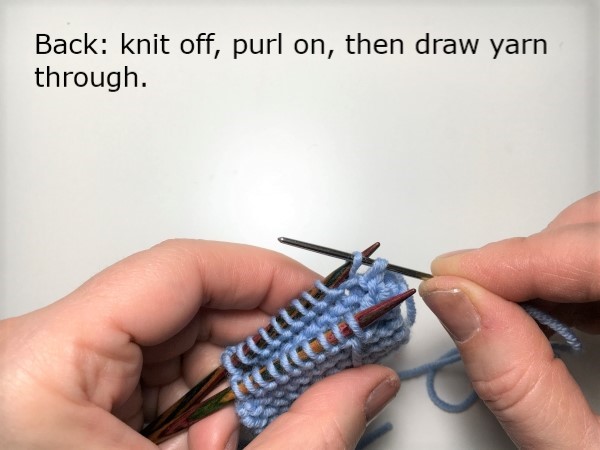
C: back needle sequence
This sequence is as for the front needle:
Pass tapestry needle knitwise through first stitch on back knitting needle, draw yarn through and slip stitch off that needle.
Pass tapestry needle purlwise through second stitch on back knitting needle, draw yarn through and leave stitch on that needle.
This sequence can be abbreviated: “back: knit off, purl on” and both steps may be carried out before drawing the yarn through.
Repeat sequences B & C until only one stitch remains on each needle. Adjust tension every few stitches using the tapestry needle to lift each leg of the stitches and tighten the yarn to match the gauge of the knitted pieces. It can be tricky to identify which loops to adjust so an example is given where the graft has been worked in a contrast yarn.
D: final selvedge stitches
Finish with the following steps:
Pass tapestry needle knitwise through final stitch on front knitting needle and slip stitch off that needle.
Pass tapestry needle knitwise through final stitch on back knitting needle and slip stitch off that needle. Draw yarn through both stitches.
The difference sequences for grafting stockinette vs garter can be summarised:
| Step | Stockinette sequence | Garter sequence |
| Initial selvedge | Front: purl on Back: knit on | Front: purl on Back: purl on |
| Subsequent stitches | Front: knit off, purl on Back: purl off, knit on | Front: knit off, purl on Back: knit off, purl on |
| Final selvedge | Front: knit off Back: purl off | Front: knit off Back: knit off |
I find it is often useful to compare other available online tutorials and the two which I reference in the Khiva Cowl are by Purl Soho and Craftsy which deal with grafting stockinette.
Grafting in the round – general points
Many of the same principles apply as for grafting flat pieces of knitting. One key difference is that the live stitches will be held on circular needles but, as with flat knitting, the wrong sides will need to be held together so it is necessary either to insert one tube of knitting inside the other or (as for the Khival Cowl which is a continuous loop) simply to hold both needles together with just the the edges of the wrong sides facing.
Unlike flat knitting, there is no selvedge to deal with so, when using a provisional cast-on, the number of loops picked up when the cast-on is undone should be the same as the number of stitches originally cast on as there are no ‘half-stitches’ sitting at the edges of the work. This also means that the sequence of steps at the start and end of the round differs slightly from flat knitting in order to achieve a truly invisible graft. In the Khiva Cowl, the end of the round is hidden inside the cowl, which does not warrant complex grafting instructions. However, in some projects this may be desirable.
There is a useful tutorial by Interweave covering this technique for stockinette in the round. It is beyond the scope of my tutorial to cover this in detail, but the key steps, as I see it, are:
- The provisional cast-on stitches are effectively on the back needle and the live stitches from the round most recently worked are on the front needle.
- Unless a contrast colour is required, a seamless finish is most easily obtained by using the yarn tail from the end of the final round on the front needle.
- Start with a ‘purl on’ on the front needle.
- The following sequence is repeated until there is one stitch remaining on each needle:
- Back: purl off, knit on.
- Front: knit off, purl on.
- The final sequence works as follows:
- Back: purl off, then pass tapestry needle knitwise through the stitch which falls immediately after the previously grafted back-needle stitch. Due to the spiral structure of the rounds, this is effectively the first stitch of the second round which was worked after the provisional cast-on and is the stitch through which the original yarn tail passes. That yarn tail can be pulled out of that stitch and the end woven in.
- Front: ‘knit off’ the final stitch, break yarn and weave in the end.
